Labels/Taxonomy for the problem pool
When having created a problem in WebMiau, it is good practice to add taxonomy to the problem. This is even more important, when adding the problem to the Problem Pool, as other lecturers can filter by this taxonomy.
How to add labels/taxonomy to my problem
-
When you opened your problem in WebMiau, click on the eye icon and then select Labels from the drop-down menu.
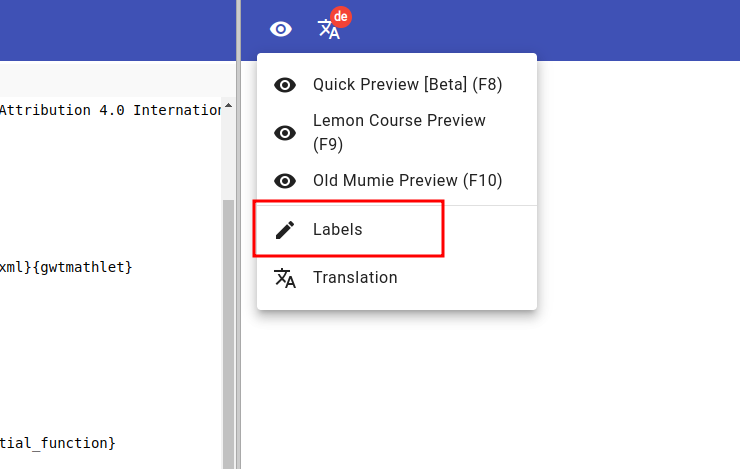
-
The label editor opens in the right column. Usage entries are never translated and are shown as entered. Whitespace (spaces, tabs, non-breaking spaces) at the beginning and end is removed, repeated whitespace is reduced to one space, and duplicate entries are dropped.
- Subsequently, choose subject area, chapter and more from the available list for the topic of your problem
- Select the appropriate checkboxes for your task in Bloom’s taxonomy
- Enter the number of steps to solve the problem
- List where you use the problem (in case you already know), see Usage below
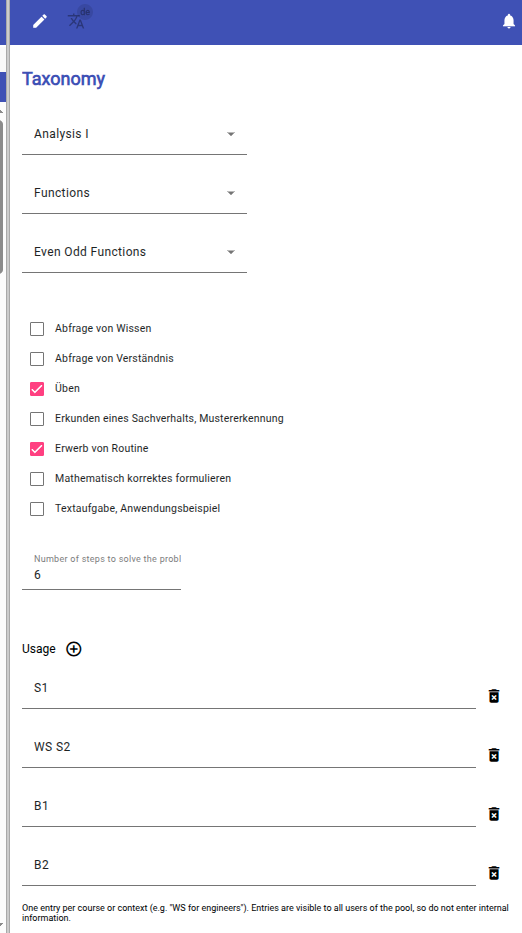
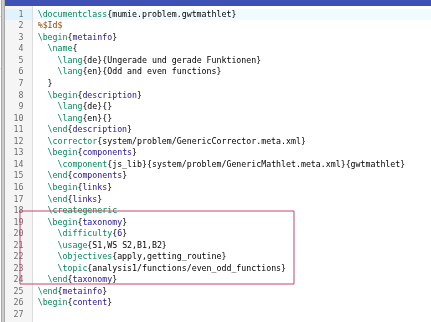
The taxonomy that you selected will also appear encoded in your source file (see below). Never change that part in the source file directly, as any tiny error might cause severe problems. If the source file contains a value that the label editor cannot read, the label editor shows an error and keeps the value unchanged, so that nothing gets lost:
- A topic that is not in the list or a difficulty that is not a number: select the topic or enter the number in the label editor.
- An unknown learning objective: the checkboxes do not remove it, so correct the
\objectives{...}line in the source file. - A usage with a forbidden character: correct the
\usage{...}line in the source file, see Usage below.
These last two cases are the only exceptions to the rule above.
Usage
Usage describes where the problem is used, e.g. in which course or context. It is a list: each entry is one place of use.
- Add one entry per course or context with the add button next to Usage, and remove entries you no longer need with the delete button. You decide which entries the list contains.
- Use the official name of the course or context, e.g. Analysis 1 or WS for engineers, and always spell it the same way. Entries are not translated, and each spelling appears as its own entry in the Problem Pool.
- An entry must not contain any of the characters
, & \ { } % $ ". All other characters are allowed, including umlauts and accented letters. If an entry contains a forbidden character, the label editor shows an error and does not save this entry until it is corrected: the source file keeps its previous value, while all other entries and fields are saved as usual. A comma cannot be used to split an entry: add another entry instead. - An entry can have at most 100 characters, so that it stays readable in the Problem Pool. Use a short, well-known name rather than a description.
- In the source file, the entries appear comma-separated, e.g.
\usage{Analysis 1,WS for engineers}. - Older problems may contain a usage with a forbidden character in the source file, e.g.
\usage{Physik \& Chemie}. The label editor cannot show it as entries: it displays the usage as it is in the source file together with the forbidden characters, and does not change it. In this case, correct the\usage{...}line in the source file directly: remove the forbidden characters and separate the entries by commas, e.g.\usage{Physik und Chemie}. The entries appear in the label editor as soon as the usage is valid. Do not change anything else in the taxonomy part.
In the Problem Pool Browser, lecturers can filter by usage. The filter only offers entries that exist in documents the lecturer can access and that match the other active filters and the search term, together with the number of matching documents. At most 500 entries are offered.
Important: Usage entries are visible to all users of the Problem Pool. Do not enter internal information such as names of persons, internal project names or notes.